By default, SSH already uses a secure data
communication between remote machines, but if you want to add some extra
security layer to your SSH connections, you can add a Google Authenticator (two-factor authentication) module that allow you to enter a random one-time password (TOTP) verification code while connecting to SSH servers. You’ll have to enter the verification code from your smartphone or PC when you connect.
The Google Authenticator is an open-source module that includes implementations of one-time passcodes (TOTP) verification token developed by Google. It supports several mobile platforms, as well as PAM (Pluggable Authentication Module). These one-time passcodes are generated using open standards created by the OATH (Initiative for Open Authentication).

In this article I will show you how to setup and configure SSH for two-factor authentication under Red Hat, CentOS, Fedora and Ubuntu, Linux Mint and Debian.
On Red Hat, CentOS and Fedora systems install the ‘pam-devel‘ package.
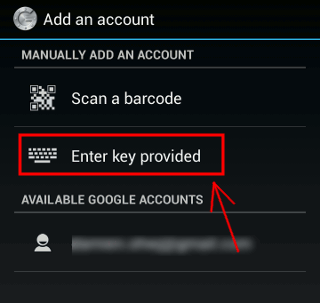
Press “Enter key provided”.
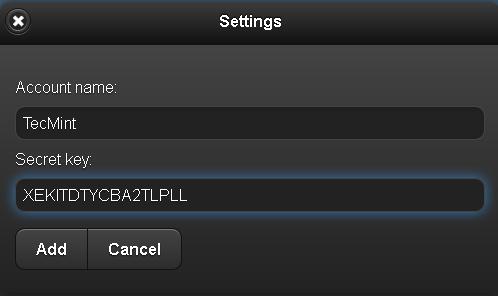
Add your account ‘Name‘ and enter the ‘secret key‘ generated earlier.
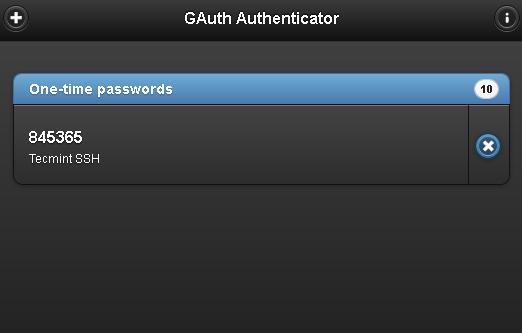
It will generate one time password (verification code) that will constantly changing every 30sec on your phone.
Now try to login via SSH, you will be prompted with Google Authenticator code (Verification code) and Password whenever you attempt to log in via SSH. You have only 30 seconds to enter this verification code, if you miss it will regenerate new verification code.
Important: The two-factor authentication works with password based SSH login. If you are using any private/public key SSH session, it will ignore two-factor authentication and log you in directly.
The Google Authenticator is an open-source module that includes implementations of one-time passcodes (TOTP) verification token developed by Google. It supports several mobile platforms, as well as PAM (Pluggable Authentication Module). These one-time passcodes are generated using open standards created by the OATH (Initiative for Open Authentication).
SSH Two Factor Authentication
Installing Google Authenticator Module
Open the machine that you want to setup two factor authentication and install following PAM libraries along with development libraries that are needed for the PAM module to work correctly with Google authenticator module.On Red Hat, CentOS and Fedora systems install the ‘pam-devel‘ package.
# yum install pam-devel make gcc-c++ wget
On Ubuntu, Linux Mint and Debian systems install ‘libpam0g-dev‘ package.# apt-get install libpam0g-dev make gcc-c++ wget
Download and extract Google authenticator module under Home directory (assume you are already logged in home directory of root).# cd /root
# wget https://google-authenticator.googlecode.com/files/libpam-google-authenticator-1.0-source.tar.bz2
# tar -xvf libpam-google-authenticator-1.0-source.tar.bz2
Type the following commands to compile and install Google authenticator module on the system.# cd libpam-google-authenticator-1.0
# make
# make install
# google-authenticator
Once you run ‘google-authenticator‘ command, it will prompt you with a serious of question. Simply type “y” (yes) as the answer in most situation. If something goes wrong, you can type again ‘google-authenticator‘ command to reset the settings.- Do you want authentication tokens to be time-based (y/n) y
[root@tecmint libpam-google-authenticator-1.0]# google-authenticator

Do you want authentication tokens to be time-based (y/n) y

https://www.google.com/chart?chs=200x200&chld=M|0&cht=qr&chl=otpauth://totp/root@tecmint.com%3Fsecret%3DXEKITDTYCBA2TLPL

Your new secret key is: XEKITDTYCBA2TLPL
Your verification code is 461618
Your emergency scratch codes are:
  65083399
  10733609
  47588351
  71111643
  92017550
Next, follow the setup wizard and in most cases type answer as “y” (yes) as shown below.Do you want me to update your "/root/.google_authenticator" file (y/n) y
Do you want to disallow multiple uses of the same authentication
token? This restricts you to one login about every 30s, but it increases
your chances to notice or even prevent man-in-the-middle attacks (y/n) y
By default, tokens are good for 30 seconds and in order to compensate for
possible time-skew between the client and the server, we allow an extra
token before and after the current time. If you experience problems with poor
time synchronization, you can increase the window from its default
size of 1:30min to about 4min. Do you want to do so (y/n) y
If the computer that you are logging into isn't hardened against brute-force
login attempts, you can enable rate-limiting for the authentication module.
By default, this limits attackers to no more than 3 login attempts every 30s.
Do you want to enable rate-limiting (y/n) y
Configuring SSH to use Google Authenticator Module
Open the PAM configuration file ‘/etc/pam.d/sshd‘ and add the following line to the top of the file.auth required pam_google_authenticator.so
Next, open the SSH configuration file ‘/etc/ssh/sshd_config‘ and scroll for fine the line that says.ChallengeResponseAuthentication no
Change it to “yes“. So, it becomes like this.ChallengeResponseAuthentication yes
Finally, restart SSH service to take new changes.# /etc/init.d/sshd restart
Configuring Google Authenticator App
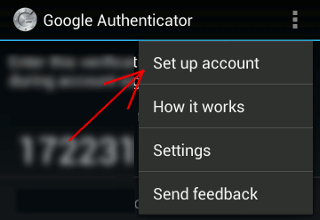
Launch Google Authenticator app in your smartphone. Press Menu and choose “Setup an account“. If you don’t have this app, you can download and install Google Authenticator app on your Android/iPhone/Blackberry devices.
Google Authenticator Setup Account
Enter Google Authenticator Secret Key
Google Authenticator Account Name and Secret Key
Google Authenticator One Time Password
login as: tecmint
Access denied
Using keyboard-interactive authentication.
Verification code:
Using keyboard-interactive authentication.
Password:
Last login: Tue Apr 23 13:58:29 2013 from 172.16.25.125
[root@tecmint ~]#
If you don’t have smartphone, you can also use a Firefox add-on called GAuth Authenticator to do two-factor authentication.Important: The two-factor authentication works with password based SSH login. If you are using any private/public key SSH session, it will ignore two-factor authentication and log you in directly.
No comments:
Post a Comment